Showing posts with label Going Green. Show all posts

Tuesday, September 23, 2014

Jean Repairs

In line with my Sewing Know How this is post # 4.
Today i am going to show you how to repair the butt in a pair of jeans. Now kids wear out the knees in jeans but men wear out the butt and crutch, i guess its all that scratching.

These jeans were just at the stage where they were not quite holes and this is the time to catch them as it makes it easy to repair.
I don't throw jeans away as they have so many other uses and one of them is repairing holes to give your jeans a longer life span.
The thread colour you use will be determined by the colour of your jeans and ill tell ya sometimes its hard to match. As these were pretty faded i went with a grey thread.
You will also need a denim needle or as large a needle as you have on hand.


Cut up your patches from another pair of jeans, make sure the pieces are not from a well worn part of the jean. Make the patch larger by 1/2 again so the worn part is well covered. Pin in place. 


Using a small straight stitch, go around the patch close to the edge, if you need to go over a thick seem then go slow or hand wind the needle through as this is a place that will break your needle if your not careful. Remove the pins and check the outside to make sure you have covered the whole area with the patch.


Now turn your jeans right side out and you are going to use a small zigzag and go over all of the worn spots.


In the picture below i did one side with blue on the bobbin so you could see it.
I only sewed on the warn parts not all over the patch.


Turned right side out and you can barely see the repair and because of where it is you can't see it at all when worn.


Denim is one of the hardest fabrics to sew as its so thick and you can break a few needles but the results are well worth it especially if you can get another 6 to 12 months wear from your jeans.

Monday, September 15, 2014

Bowl Covers

In line with my Sewing Know How , this is post #3.
From the leftover Table Cloths i made these bowl covers.
You will need leftover fabric i used my table cloths and i also used some leftover duck cloth and some drill from another project. Furnishing fabrics work great as will any medium to heavy weight cotton cloth. Your sewing machine will come in handy as will some matching thread or just use white thread. The last item you will need is some thin elastic.


Friday, September 05, 2014

Old Table Cloths

In line with my Sewing know How , this is post # 2. Today its all about straight lines and re-purposing / recycling.

My cupboard was overflowing with table linen, there were a few that either did not fit our table or were damaged. The solution was to turn them into something new.


In the above washing basket are the ones that are to be made new again.
There was one vintage cloth [below] that had a few holes that were too large to repair so i ripped it up and made 4 food covers, i will use them for cooling bread or pies. I don't recommend ripping up vintage table linen as its hard to come by these days. This one was one of my favourite cloths, but at the same time i still wanted to use it so came up with this idea.

Wednesday, September 03, 2014

Happenings in the Greenhouse

At the end of summer i took cuttings from some of my fruit trees to see if i could get them to root over winter in the greenhouse. I removed the bottom leaves, soaked the stems in water for a few mins and then dipped each one in rooting hormone and popped them into the grow pots.


Thursday, August 28, 2014

Sewing Know How

Once learning to sew was taught to children either at home or at school, now its does not seem that people think its a necessary skill to learn. Every thing is cheap to buy and easy to throw away. 
It makes me sad that we have created such a disposable society.


Why should you learn to sew? Well if you can sew then decorating your home or clothing your family becomes something you can be proud of, not to mention all the beautiful gifts you can make.
Rest assured that anything you make will last at least 10 times longer than a cheaply bought item. Sewing can also save you money.

That's my trusty old sewing machine above, she's a Janome My Style 30, a gift from my husband and father in law for Christmas, i think it was 1989. She has only had one service and that was last year, she just keeps going and going.


Wednesday, July 30, 2014

Sunny Lemons

Today is all about Sunny Lemons, we have a small lemon tree in our vege garden area and it is full of fruit. I love anything lemon especially if its very tart. 


Drying lemon peel and what to do with it.


 First off i scrub the lemons with a small nail brush to remove any dirt. The water in the green tub will be tipped onto the garden when im finished instead of going down the drain.


I use a sharp knife to peel the skin off the lemon, you don't want too much of the pith [the white]. As you can see above most of the pith still remains on the lemon.


If the slices are too long cut or tear them so they sit flat-ish on the dehydrator tray. I ended up with 5 trays of peel from 16 lemons. When using your dehydrator you use the same amount power if you do 1 tray or 10 trays so if you can, fill up the other trays with other items.
This day i added one tray of parsley, one of pac choy and one of bread so all 10 trays are full. Those trays will go on top as they will finish drying quicker than the peel.


As you can see above, i also did two trays of orange peel as well.


Six hours at 55 degrease Celsius and this is the result, crispy hard peel. 


The peel was then put through my Tribest Personal Blender [i will do a review on this another day].


What do you do with all this peel you may ask, well it can be used in biscuits, slices, cakes, pies, ice cream just about anything you might like a lemon flavour to. 
Now i have 16 lemons that need to be juiced, some of the juice will go in recipes and the rest will be put in the freezer for future use.

Stay tuned for lots of lemon recipes.


Linked here Homemade Monday #91
and here Farm Blog Hop
and here Homestead Barn Hop #169
and here Wonderful Wednesday Blog Hop #84
and here Homemaking Party
and here Maple Hill Hop #41
and here Backyard Farming Connection Hop #91
and here Tuesdays With A Twist #69
and here Home- Making Mondays #11
and here Homemaking Party

Saturday, July 26, 2014

Chook Feeder


When we went out to the Mudgee Small Farms Show the other week we came home with a new chook feeder.


Mr GoingGreen walking through the top orchid going down to the chook yard. New feeder in one hand and a bowl of hot breakfast for the girls in the other. That hot breakfast was rolled oats, grated carrots, garlic, cabbage and milk mmmm.


This is the old plastic feeder with the open top that held about 2 kg. If it got spun around too much the green base would come off. We have it hung on an old cooking tripod.


The new feeder holds 9kg of feed and has a lid and the base is attached. It was $30, i don't know if that's a good price or not and i'm not all that happy with it.
 I think that it lets out too much feed all at once and lots more gets wasted either on the floor of the shed or to all the blasted birds who think its a free for all.
When i move the girls up to the vege garden for the day i just close the shed door so the birds cant get in. A couple of times i have put the feeder into 44 gallon drum at holds all the bulk feed and get it back out again in the afternoon. I cant just close up the shed when they are in the yard or they will lay their eggs outside.

I did find a set of plans for a Treadle Chicken Feeder and i think that i'm going to get Mr GoinGreen to make me two of them. The reason for two is that Miss Black is mean and does not always like to share. We did see the grandpas metal chook feeders at the show as well as another company's but at $195 each its just way out of most peoples budget and if you order on line you can also add Aus Post charges on top of that.

I would love to hear about what sort of feeder you have for your girls?

Anne here is the link for the Firewood Permit you asked about, we are headed out there tomorrow and we will be picking up a couple of boxes of apples, at $10 a box you cant go wrong.


Linked here Say G-Day Saturday Linky Party #97
and here From The Farm Blog Hop
and here Old Fashioned Friday #78
and here Simple Lives Thursday #203
and here Simple Saturdays July 26

Sunday, July 13, 2014

2014 Mudgee Small Farms Field Days


Two and a half hours saw us at this years Mudgee Field day. I was cold but very sunny and seemed to warm up after lunch.


I didnt take very many photos there was just too much to see.


One of the faves is the Working Dog trials, with so few commands they get the sheep where their master needs them.


 From the paddock to the pen and through the shoot. These dogs and their masters are a wonder to watch.
If only our Sally Girl was half as trained as these dogs.


Lots of machinery, tools and farm vehicles. Also a big display of old tractors and other farm equipment.


The Lucas Mill is one of the most impressive pieces of equipment, set up is just 15 mins and your ready to mill your logs. If you have the timber on your property this is the way to go if you want to build your home or any other building you may need. The guy was cutting an Iron Bark log and the boards were a beautiful red, there is nothing like Australian hardwood.


For lunch we had $8 beef burgers, they were small but very tasty.
There were quite a few animals from lots of different farms. Cows, horses, sheep, dogs, pigs, alpacas, donkeys, rabbits, and of course chooks and ducks. The poultry pavilion was only small but there were quite a few breeds on show & most were for sale. 
I would like to say that i came home with some new feathered friends but alas they were out of our price range, how ever we could have come home with a sow and 7 piglets but i dont think the neighbours would have liked that. 
They had the cutest miniature donkeys and a kelpy puppy that should have come home with us. I was a little disappointed that there were no Anglican Nubian Goats as we would have defiantly considered bring home 2 of them. 

There was a hands on demonstration about Scythes, i think if you just have a few animals to feed then small scale hay making would be the way to go, it may be hard work but it would also be very satisfying knowing you grew and cut you own animal feed.

We came home with lots of information and a new chook feeder. It was a very good day out.


Thursday, July 10, 2014

Winter Warming

For the past couple of years we have gone out to the state forest to cut firewood for the winter.
You pay for a permit to get a certain amount.


We headed out to the Hampton area this year, it is a great drive. You can only cut fallen timber, if its still standing its off limits. The above picture was a pine plantation that has been clear felled, all that is left is native forest.


We only take fallen natives, usually gum, yellow box or any other hard wood. Sometimes we will take a couple of rounds of pine and split it for kindling.


You must always layer up in the clothing department cause its very cold & windy out there in winter.
It's always a great day out, i pack a big lunch and a couple of thermoses for the coffee and tea.
Cut wood, have lunch, cut more wood till the trailer is full and then a scenic drive home.
We have a system, Dad drives, Andrew cuts and i load.


On the way home we always stop at the Hartley Roadhouse as there are stalls in the car park on the weekends, we get our Honey, Apples and sometimes eggs when my girls refuse to lay. The apples we buy are seconds, i dry them out and make pies but more on that another day.


Thursday, February 13, 2014

Building a Greenhouse


I can't believe it has been more than a year since i last posted, time really does fly by when your busy.
House renovations, gardening & work make Nicole a very tired person who would really love a get away to the sea to recharge my batteries, but alas no matter how much gardening i do i still cant find that money tree.


in 2012 my wonderful husband used his tax refund & purchased this for me a 6x3 Greenhouse.


after some thinking & rethinking we finally found a home for the new house. the boys had to dig quite a lot of dirt to level it up.


it took a few weekends to get this baby from the box to the finished house.


the directions were really difficult to understand (few words & fewer pictures), i think they were written for the person who has put one of these up at least a dozen times. we spent a lot of time undoing & adding more bolts sliding things around.


until finally our little house was finished.


all the staging & racks were purchased separate (still have 2 more in their boxes). added newspaper & cardboard to the floor & a couple of weeks after that wood shavings on top.
a few seeds in & we're under way. growing by seed is very rewarding, i know exactly what i'm getting with no chemicals or other sprays that you would normally get when buying seedlings from a nursery or hardware store & not to mention a lot cheaper.
i have just been reading a book called "New Plants From Old" by Jackie French & i have been inspired. Jackie talks about propagating plants that you pick up on your travels, walking about the neighbour hood or from friends & family. just pop it in a pot water & see what happens :o)
something else she talks about is, if it tastes good then pop the seed in a pot & see what comes up. 
this has been very successful for me & very exciting as i have had quite a few fruit seeds germinate & some that are ready to be taken out of the grow pots & potted up.
i find myself spending a few hours every week in the greenhouse its very relaxing & Sally Girl keeps me company. 

Tuesday, March 27, 2012

Orange Cleaner

Orange Cleaner and Frozen Juice Bricks


we have 3 orange trees, two are young and have not produced fruit yet and the other is about 3 meters tall.
below is the last of the harvest about 6 or 7 kilos, they aren't large but they are very juicy and sweet. The tree is full with tiny green oranges just waiting to grow.


Orange Cleaner

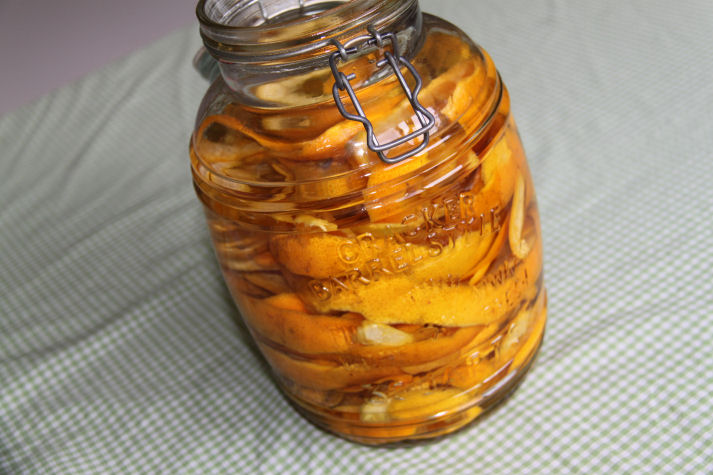
first off get yourself a big jar or bottle, this one holds about 2 1/2 litres, i picked it up from the Salvos store for $2. wash your oranges to remove any dirt [if you are using purchased oranges scrub them to remove any wax].


 peel enough oranges to fill your jar with peels.

fill your jar with Vinegar so all is covered

place your jar out of direct light & mix or shake once a day for about 6 to 8 weeks. strain out all the peels.
you can use it earlier but the longer the better.

in a spray bottle mix 50/50 with water.
great for removing sticky labels, band-aid sticky, cleaning stove tops & range hoods & tiles


now we are left with naked oranges that you can juice.
if you still have a few with skin on you can zest them & store the zest in the freezer until needed.
some of the juice we drink but the rest is frozen into 1/2 cup bricks & stored in the freezer.
you can use them for cakes, biscuits or my favourite fruit smoothies.
just drop a brick or 2 into your blender & add 1 banana, handful of strawberries,1 Tbl honey & 1 cup yoghurt.
the combinations for smoothies are only limited to your imagination.


Orange you glad you popped by :o)

Tuesday, November 15, 2011

Bath mats


6 new bath mats from 2 towels.
fold your bath towel in thirds & cut, then just lay out your chosen off cuts & sew together. place the font side down & machine stitch around the outside leave an opening to turn right side out. stitch around the outside & along both sides of the seams if you like & your done.

 these two towels i purchased about 20 years ago they are very good quality towels made in Australia. we could still have used them as bath towels as they are still nice & thick, however as they are just a regular size towel they are a little small for my boys now [perfect for when they were children]. we now use bath sheets. [imagine how many mats i could make out of one of those].


some of you may remember the blue, green & white fabric from this post, it is the left over fabric from the curtains i made using a sheet from the op shop.


these ones the brown check fabric came from a friends throw out {thanks Carolyn} & the surfboard fabric is left over from some PJ shorts i made for summer.

Friday, October 14, 2011

Sheets to dust cloths

when your old flannel sheets become thin cut them up into dust/cleaning rags
i let the fabric dictate the size of each cloth & then fold in half & stitch around the edge.
they are soft enough to polish & strong enough scrub with.
they last quite a long time esp the ones that are cut from the edge of the sheet as its usually still like new.
they can also be used to make wee wipes.

Wednesday, September 28, 2011

About Time

we need to watch our pennies even more now as i quit my job on Monday & until i find a new one things will be tight.
so i thought i would start with emptying my downstairs fridge/ freezer & turning it off, as you can see below there was not much in it & such a waste of power/money. its usually full of drinks & chook scraps from work.

i moved all the frozen items over to the big box freezer

i have a limited amount of money in my bank so i will be running a tally of all spending, to start me off

Tuesday- train ticket $5.40
               food $16.65
i spent most of Tuesday morning dropping of resumes in Leura & Katoomba, i dont know how successful this will be but you have to get out there & try.

i feel good about finally quitting my job, however i will miss my friends & all the food for my chooks.
i felt like i was being taken advantage of by my bosses & working in a factory full of woman is really hard, especially when your the one who has people coming at you from both sides.
well enough about that, its a new day & a new start lets hope i dont stuff it up :o)